

All built and ready to get started?
Congratulations on getting your machine all set up and running! But before we dive in let us explain to you the basics!
These steps are designed to help you get started with our Wall Mounted Injection, Standard Injection.
Safety First - The 3 Risks
-
Electricity
Like all electrical appliances, there is a risk of electrical shock if used incorrectly. All our machines are grounded and fused, however, it's important to never get the machine wet, always use a grounded plug socket and never work on the machine's internals without first disconnecting from the power supply.
-
Heat
The injection machine can reach temperatures of 280c. Most of the heated zones are covered, however it's important to note that the barrel nozzle, moulds, and hopper are all exposed and can get very hot when in use.
-
Fumes
When melting plastic, depending on the type and temperature the plastic may give off fumes. Do not inhale these fumes as they are very toxic and never let the machine smoke. If there is smoke, then something is wrong, and the temperature is too high.
Safety equipment
To protect yourself from the 3 mentioned risks, it's important to always wear PPE (Personal Protective Equipment).
We recommend:
Long-sleeved and long-legged clothing that covers as much skin as possible.
Full Face Shield
A well-sealed and correct-fitting 3M Mask with ABEK1 Filters.
Thick Heat Resistant Gloves (Like Welding Gloves).
Close-toed shoes.
It's important to note that the ABEK1 mask must be stored in a dry-sealed container when not in use, as it only has a filtration life of 40 hours. However, as a rule of thumb, if you can smell any plastic fumes through the mask, it's time to change the filters.
Tips for reducing fumes
Wash, rinse & thoroughly dry plastic well before melting it. Residues from cleaning products can create harmful fumes.
Never melt unseparated plastic, because different plastic types have different melting temperatures, meaning some plastic will burn before others are melted.
When working with PS or ABS, make sure you don’t melt it for more than 8 hours per week, and always use a gas mask and ventilation.
Don’t use a regular dust mask, that won’t work! Make sure you use an activated carbon filter gas mask. And make sure your gas mask is fitted properly!
Try to melt plastic at the lowest possible temperature for the shortest amount of time. We recommend for PP starting at 190c.
If you ever feel dizzy, or it’s hard to breathe, move away from the fumes into fresh air.
Keep away from the fume source - it’s 14 times higher than the recommended maximum exposure. If there’s no ventilation, you have to have a mask and stand about 2m away.
Work in a well-ventilated space with a high ceiling.
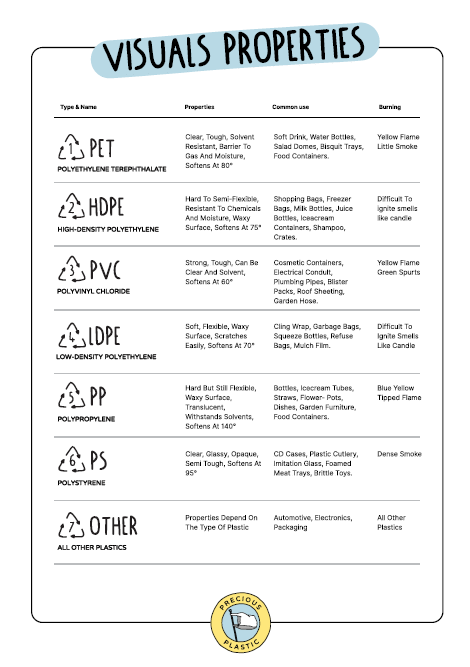
Know Your Plastics
Melting the wrong plastic at the wrong temperatures can cause strong fumes! Make sure you know what plastic you are using and make sure its clean and free of other chemicals.
Don’t Mix Plastics
Every plastic type has its own unique melting temperature. If you mix different plastics together you risk you increase the chances of burning one of them. This will not only reduce the quality of your product but it will also produce harmful fumes. So always sort your plastics properly and if in doubt its always best to discard any mixed or unidentified plastics.
Always Ensure Your Plastic Is Clean & Dry
Depending on how you source your recycled plastic, always make sure your plastic is clean and dry. Any contaminants such as oils, food, glues, or soaps which may be commonly found in recycled plastic must be removed before putting in the machine. Failure to do so may result in these items burning in the machine or generating fumes/gases when heated up.
Plastic must also be dry to prevent any steam from building up inside the barrel. We recommend always storing your plastic in an air-tight container once dried to ensure no moisture or contaminants enter the plastic.

INSTRUCTION MANUAL
1.0 Introduction
1.1 The Arbour Injection Machine
The Arbour Injection Machine is a versatile and user-friendly standalone injection moulding machine designed for small businesses and educational institutions. With its hand operation and precise performance, it enables the creation of high-quality plastic parts. It's ideal for prototyping, small-scale production, and educational projects. The Arbour Injection Machine ensures safety, ease of use, and consistent results. Empower your business or educational institution with this sustainable solution.
1.2 Components

1.3 Specifications
Dimensions: 110 X 64 X 190cm (L x W x H)
Weight: 45kg
Power Input: 220 V, 50-60 Hz (220V), 110 V , 50-60 Hz (110V)
Plug: Type G (UK), Type F (EU), Type I (AU), Type B (US)
Injector: Hand Powered Leaver
Total Power: Max 600W
Setup: Stand Alone
Mould Connection: Screw System
Nozzle Thread: ½” BSP Female
Heater Power: 600W
Injection Pressure: 30bar
Shot Volume: Max. 150cm3 / 140g (165cm3 True Barrel Volume)
Plastic Types: PP, HDPE, LDPE, PS, PLA
Plastic Flake Size: 2mm to 20mm
Max Mould Space: 30 x 34 x 34 cm (H x D x W)
Plastic Melting Time: 8-12 minutes
Full Cycles Per Hour: Max. 7 times with 140g
Output: 0.98kg/hr*
Maximum Temperature: 280°c
Temperature Regulation: Yes
Heater Type: Heat Bands (4)
Number of Operators: 1
Shipping Dimensions: 100 X 20 X 20cm (L x W x H)
Shipping Weight: 45kg
Shipping Method: Parcel
Customs Tariff Number: HS84771000
2.0 Operation & Maintenance
2.1 How the Injection Machine Works
NOTE: Before operating the machine, make sure to read and understand the chapter “3.0 Safety” section in this manual.
Recycling plastics requires 3 things to work; Heat, Pressure and a Cavity (mould). The Injection Machine is the simplest method to do this. As a result, there are many different versions of the machine on the market. From small desktop machines, to massive automated machines that can produce thousands of units an hour.
The Sustainable Design Studio’s Injection Machines are designed as the perfect middle ground for these machines. Allowing the user to have a fairly large injection capacity, without the price tag, nor the space requirements of much more professional machines.
Our injection machine works by taking fairly accessible and reliable components and building them into an easy to use and repairable machine that can easily be shipped to anywhere in the world in just two cardboard boxes.
Shredded plastic enters the hopper and is heated and pressed through a long barrel into your mould. The output colour is often unpredictable when mixing colours in the barrel, allowing for beautiful (and suprising) patterns that can add to your one of a kind products.
2.2 Operating the Machine
IMPORTANT: When you turn on the machine for the very first time (or after leaving the machine a long time) the Rockwool insulation has likely absorbed moisture. It will let off a white steam/smoke when heated up. This is nothing to worry about.
IMPORTANT: When using the machine for the first time. Once heated make sure to tighten the pipefitting & nozzle at the bottom of the machine. The heat expands the barrel and allows you to tighten the fitting further ensuring no plastic leaks.
IMPORTANT: If you are using a carjack or scissor jack to hold your moulds against the injection machine make sure that you don’t over-tighten the jack. Most jacks are 2 Tonne, and although great at keeping your moulds in place, they do have the potential to damage the machine. Always use the smallest amount of pressure possible to keep the mould in place.
Startup
Turn on your ventilation system and ensure extraction is located within 10cm of the nozzle and the hopper of the machine.
Make sure the lever is rotated so the plunger is at its lowest position.
Turn the machine on and set the temperature to the temperature according to the plastic type you wish to use.
Wait for 10 - 20min for the machine to reach the desired temperature.
NOTE: If the temperature doesn’t immediately start smoothly rising please turn off the machine and inspect the electronics.The machine is now ready for production.
Production
The machine is now warm and ready to use with your moulds.
Raise the jack and mould support gently against the nozzle.
Fill the barrel with your chosen plastic type.
Press the lever into the barrel.
Pull the lever up every 2 to 3 minutes and add more plastic.
Wait at least 7 minutes before injecting.
Now for the mould - lower the jack.
Quickly place the mould underneath (to avoid plastic flowing out) and rase the jack.
Once the mould is secured to the machine push the lever down as far as possible, until you cannot push any further (this means the mould is full). Don’t be scared to give it a lot of pressure, it can easily hold up to 80 kg.
Hold the pressure down for about 20-30 seconds (this will avoid heat sinks on the surface of the injected piece).
Pull the lever up.
Lower the jack and remove the mold from the machine and leave it on the side.
Raise the jack up gently against the nozzle.
Fill the machine for the next product.
Set up a timer for 10 minutes.
Open the mould once it is cooled down.
Tip: Before injecting into the mould, make sure the plastic in the barrel is completely melted in order to fill all areas of the mould. To ensure this you can remove the nozzle cap and gently push the lever down to let a little bit of plastic come out to check the consistency. If it's not the desired consistency, increase 5 degrees at the time until you achieve the desired consistency.
(*Warning*: Plastic should never be in a liquid state, this means plastic is burning and can be very dangerous for the operator and can cause very serious burns).
Cooldown
When you turn off the machine, empty the barrel completely (ideally into a mould to not waste the plastic) - this makes it easier for the next person using the machine.
Leave the machine with the lever all the way down.
Turn the machine off.
Tips & Tricks while using
The hotter the plastic the greater the sink marks on the final product. To prevent this use the lower melting temperature possible and hold the pressure down for a few seconds after injecting, this will allow the plastic too cool down under pressure achieving smoother surfaces.
Clean plastic leftovers from the mould when still warm, it will be harder to clean later, if needed use a heat gun.
Use mould release on the mould, it helps with the release.
Keep the barrel full with plastic at all times, adding a bit of plastic between injections, will make the production more efficient.
To create an efficient process it is advisable to run the machine for a few hours once it is on - don’t start and stop the machine too often as the process will be very inefficient and very energy consuming.
Troubleshooting
If the plastic is clogging at the end of the barrel and doesn’t come out, raise the temperature of the nozzle heater (± 5 to 10 °C) to fully melt the plastic and release the block, you can also use a heat gun to warm up the nozzle, this generally happens with the first injections of the day.
The final product might get stuck in the mould making it hard to release, if this happens gently heat up the mould with a heat gun to soften the plastic and help release it.
Temperatures
Below you can find a diagram with the best settings for this machine based on our experience. This is only a reference for where to start - the required temperatures and times can vary depending on location, air temperature or plastic source. We recommend to make one yourself based on your own data collection.

2.3 Maintenance
Daily
Flush barrel after use with clean / virgin PP.
Remove with a soft brush any plastic flakes and dust from surfaces and covers.
Scrape off any cold molten plastic from surfaces.
Monthly
Check that there are no loose fasteners.
Check that the nozzle is securely in place.
Check that the heating elements are all in working condition. This can be done by turning the heating elements on for 30 sec, then turning it off and measuring each element individually with a thermometer gun or a thermometer. If the temperature reading does not increase, the heating elements may require replacement. A Licensed electrician must install any replacement when necessary before further use.
Yearly
Deep clean up of the machine. This includes:
Check for signs of rust on the fasteners. It’s good practice to take out all fasteners, apply a bit of grease and reinstall them or replace them if they are too rusty.
Ensure that the barrel is free of any foreign objects (like small bits of metal).
Remove the nozzle and thoroughly clean out plastic and any build up of dirt or grime. Then carefully inspect the condition of the thread. If it’s worn out, it should be replaced. To do this you will need to warm up the machine a little bit to soften the plastic between the thread and the nozzle, this can also be done with a heat gun, do not handle the nozzle with your hands when hot.
Open the electronics box and inspect for signs of dust, liquids or burn marks. Also ensure all wires are securely in place. If you don't have any knowledge about electricity or any repair is required, seek a licenced electrician.
2.4 Create
This machine will allow you to be versatile with your production because all you have to do is screw on another mould and you can be making a completely different product. Be sure to check out the mould section of our website to find what other moulds can be used with your machine.
https://www.sustainabledesign.studio/store
Note: The total amount of plastic that can fit in the barrel is around 150 cm3 - this will limit the volume of the final product. It's not a problem, it is just a design constraint.
3.0 Safety
3.1 General Instructions
This machine is designed to process thermoplastics only. Processing other materials could introduce additional hazards.
It is recommended that the source and grade of the plastic material is also known and does not contain any contaminants (for example water, chemicals or oil) that could introduce additional risk.
Batches of mixed plastics should not be used as they may possess different melting temperatures - melting plastic at the incorrect temperature may increase the risk of VOC emissions.
Regular maintenance must be conducted at intervals specified in 2.3 to ensure the system is working as intended.
Electronics box and its contents have been designed or selected for the safe operation of the machine. As such, they should not be removed or replaced by components which are not identical.
The machine must not be modified in any way. Doing so may introduce additional hazards.
The plunger can get very hot and the user must avoid touching it.
Do not burn plastic.
3.2 Fumes
During the plastic melting process, hazardous compounds including volatile organic compounds (VOCs) are released.
A ventilation system with an activated carbon filter or other filter suitable for VOC filtration must be used in conjunction with the machine at all times.
Consult the manufacturer guidelines of the filtration unit for details about maintenance and filter replacement.
A respirator suitable for VOCs should always be worn when dealing with plastic. Consult the manufacturer guidelines for instructions on replacement intervals of filters.
It should be noted that melting thermoplastics above their unique melting temperature is proven to emit a higher level of VOCs and thus should be avoided. It is the user’s responsibility to be informed on these melting temperatures and avoid heating plastics above these values.
It should be noted that processing PS emits a higher level of VOCs which are hazardous to health and additional safety measures such as a VOC detector and additional space filtration is recommended when processing this materials.
Processing PET, PVC and other plastics not mentioned in section 1.3 can be highly hazardous and not advised with this system.
3.3 Moulds
When manipulating moulds, particularly when releasing products from hot moulds from the machine, must be done using high heat resistant gloves.
Direct contact and handling of the moulds when hot is not advised.
Don’t touch the moulds or nozzle when heating elements are on.
Never put your you face, leg or arms under the nozzle of the machine while open and hot.
Never use the machine leaning down with both knees on the floor (only one is recommended). You should be able to step back quickly if needed.
Only use molds which are specifically designed for this machine and are capable of handling high pressures.
3.4 Ancillary Equipment
This machine is not designed to be used in conjunction with any other equipment than what is provided.
Ancillary equipment shall not be mounted to the existing frame.
Any additional equipment used may introduce additional risk which is not the responsibility of Precious Plastic.
3.5 Workspace Hazards
Make sure the machine is standing level on a strong surface during operation. Always make sure to have 80 cm or room all around the machine during operation.
We recommend to mount the frame of the machine to the floor or wall for safer operation.
It is recommended that an additional risk assessment specific to your space is completed to identify and control risks posed by the machine in your specific context. Note: that tripping and slipping hazards can have more severe consequences when dealing with hot equipment.
3.6 Personal Protective Equipment
Heat proof gloves such as MIG welding gloves should be used at all times while using the machine. These gloves should extend to provide protection to the forearms as well.
A work suit or coverall that covers arms and legs must be worn while using the machine.
Sealed safety glasses or a face shield must be worn at all times in the vicinity of the machine to protect from spontaneous ejection of hot substances from the mould area or the unlikely failure of moving parts.
A fitted respirator with ABEK1 filters must be worn at all times by all operators working in the same room than the machine.
Closed shoes must be worn at all times by the operators while using the machine.
3.7 Emergency Situations
The machine can reach temperatures of up to 350C and so as such, poses a serious risk of fire if there are no steps taken to reduce this risk.
It is recommended that an individual risk assessment is undertaken for each specific workspace. As part of this assessment, a fire extinguisher shall be located near the machine.
It is recommended that all operators shall regularly undergo an induction on the emergency procedure associated with their specific space.
3.8 Safety Stickers

Safety stickers on machine frame - from left to right:
Burn Hazard: indicates a hazardous hot surface.
Wear Eye Protection: indicates that eye protection is required when using this particular machine.
Wear Respirator: indicated that a respirator is required when using this particular machine.
Wear Gloves: indicates that heat resistant gloves are required when operating this particular machine.
Wear Protective Clothing: indicates that protective clothing is required when operating this particular machine.

Safety stickers on electronics control box - from left to right:
Electrocution: indicates hazards due to live parts.
Do not switch: do not disconnect during operation.
Read manual: read manual before using the equipment.
Electrical equipment: authorised personnel only.
Disconnect power: disconnect power for service or cleaning.
4.0 Installation & Decommissioning
4.1 Preparation
Before installation, store the machine indoors away from moisture, rain and dust.
Before any unpacking or assembly occurs, it is recommended that all people involved wear the appropriate personal protective equipment. For this procedure, appropriate PPE includes: eye and hand protection and steel capped boots.
A pre-operation inspection is also recommended in order to plan the procedure and identify any risks specific to the environment or particular equipment.
The machine shall only be connected to power with the included power cable. Any modifications must be checked and approved by Sustainable Design Studio.
Prepare your tools and materials for the assembly of your machine. For this you’ll need all the parts you’ll find in your kit. To assemble everything together you’ll need the following tools:
17 mm spanner or adjustable spanner
13 mm Spanner or adjustable spanner
Small Philips Head Screwdriver
PH2 Screwdriver
Metric Allen key set
4.2 Decommissioning
Disconnect the machine from the power supply before any dismantling occurs, it is recommended that all people involved wear the appropriate personal protective equipment. For this procedure, appropriate PPE includes: eye and hand protection and steel capped boots.
Dismantle the product in accordance with all the precautions imposed by the laws in force in the country of use. If required before demolishing request an inspection by the relevant authorities and relative report.
Dismantle the system down to the individual parts.
Proceed with disassembly of the individual components/parts and group them together according to the materials they are made of: (steel, stainless steel, aluminum, electrical parts, electronic parts).
Clean all the disassembled parts.
Dispose off / scrap the separated, segregated individual parts /materials in compliance with the laws in force in the country of use.
5.0 More
5.1 Online Resources
Getting started can be overwhelming. Plastic recycling is a big topic and there is a lot to learn. We do our best to create online tools to help you find more information and resources:
Website
Our website explains everything around the project, from the history and mission, to machines, the projects around it and which options are there to start recycling.
Resources
The Resources is where you'll find video tutorials, tips, drawings and much more on topics like plastic, machines, product design, business and so on.
www.sustainabledesign.studio/resources
Store
The Store is where you can buy new machines, parts and moulds.
www.sustainabledesign.studio/store
5.2 Feedback & Support
Your feedback is valuable to us!
Finding errors and typos on our website? Have an idea on how to improve our machines and moulds? Or other feedback for our solutions? Let us know! So we can improve our services for you and all our other customers.
The problems you encounter, inconsistencies, unclear descriptions or things that just feel like they could be improved is all valuable feedback for us to fix and grow better, together.
If you would like to provide feedback please email us at:
contact@sustainabledesign.studio and title the email “Feedback”