
Ready to get started?
So you are the lucky owner of a brand new and shiny recycling machine, but it came in a box and now you need to assemble it!
Don’t worry the next steps are designed to get you started as soon as possible. Depending on if you received the Arbour Injection Machine Kit or Partially Built Version the following steps will differ.
Assembly Guides
-

1. Electronics Box Assembly
If you bought a Injection Machine Kit your journey starts here!
-
2. Barrel Assembly
This is the second stage for the Injection Machine Kits.
-

3. Build It
If you got an Injection Machine Partially Built, then this is the starting point for you.
-

Get Started
All built? Great let’s make something!
Quick start tips.
-
PPE
Always wear PPE when using this machine, in a well-ventilated area.
We recommend:Long Sleeved Clothing that covers as much skin as possible. Safety Glasses. 3M Mask with ABK1 Filters. Thick Heat Resistant Gloves (Like Welding Gloves).
-
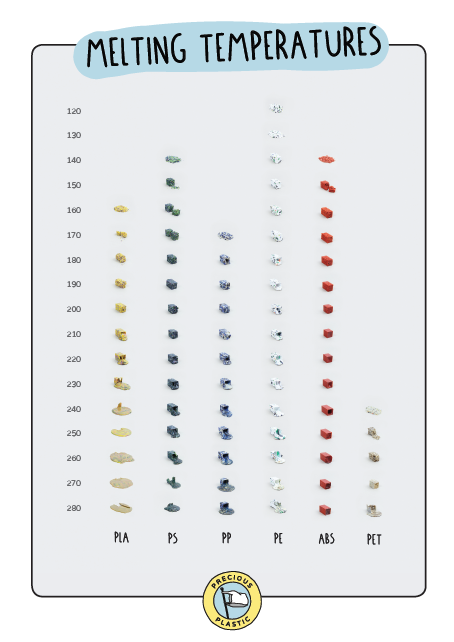
Know your temperatures.
Take note of the time it takes to heat up the first few times you turn the machine on (from 0 to 200c). If this time slows in the future or it struggles to reach temperature then there may be a broken headband, or the thermocouple has come loose!
This machine is in Degrees Celsius, designed to work up to 260c
-
Always monitor your machine.
The temperature should rise gradually, if it jumps around or rises extremely rapidly, unplug and check the wiring.
-
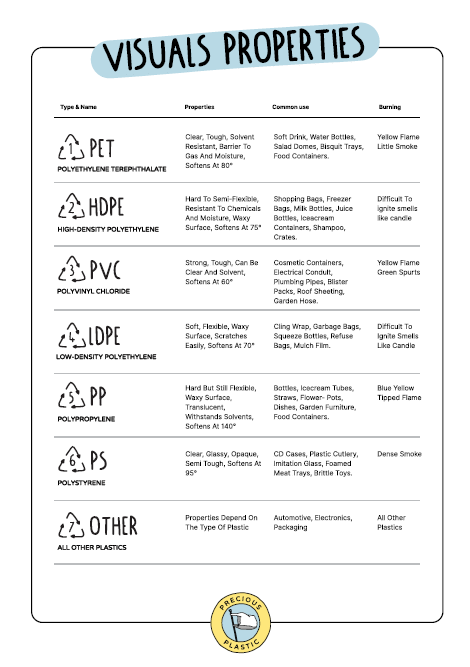
Know your plastic types.
Make sure you know what type of plastic you are using. The best plastic types in our opinion are PP, HDPE and PS (In that order).
-
Keep the moulds warm.
Warm moulds work better than cold ones!
-
Learn to use the PID's
Setting the PID’s can be a little tricky to start, Try Googling “How to Set Rex C100” and some videos will come up guiding you through the process.