
How to reuse 3D printer waste
A practical guide to what to do with failed prints, supports, and old spools, by filament type, with the honest case for injection moulding over remaking filament.
The maker waste problem
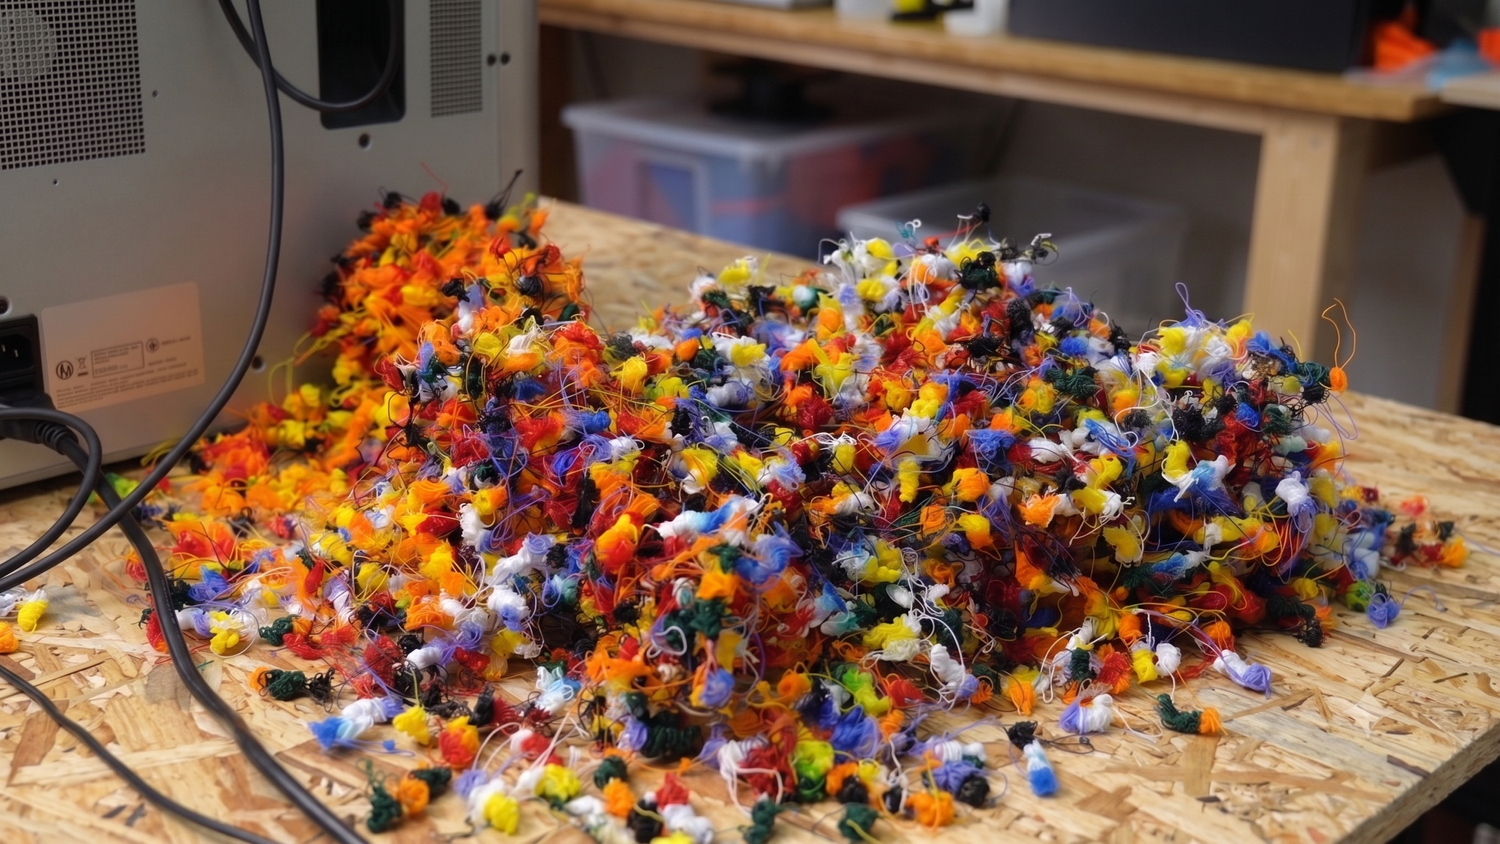
A 3D printer produces more plastic waste than most owners realise. Failed prints, supports, rafts, purge towers, half-used spools, abandoned prototypes. For a hobbyist with one machine that might be a kilo a year. A school with five printers will see ten times that. A small studio can hit fifty kilos. The question is what to do with it, and how to reuse 3D printer waste in a way that pays back the time you spend on it.
Three options exist, and most guides cover them in the wrong order. You can bin it, which is sometimes right and more often wrong. You can shred it and re-extrude it back into new filament, which is the popular advice and the focus of every filament recycler in the market. Or you can shred it and inject it into finished products, which is the path Sustainable Design Studio is built around, easier than the filament route and more valuable than the bin.
This guide covers all three, honestly, and if you have a bin of failed prints piling up, we hope by the end of it you will know exactly what you want to do with them.
Sort it first
Whatever route you pick, the preparation work is the same. Get it wrong and both downstream routes fail equally.
Sorting by filament type is the first job. PLA prints near 200°C, PETG near 240°C, ABS near 230°C. Mix them in one shred bin and the lowest-temperature material burns before the highest one melts. Sort as you bin, and label everything.
Then clean every part of glue stick residue, magnetic bed leftovers, PEI sheet bits, painter's tape, and brim adhesive. A small smear is enough to discolour or weaken every product you make from that batch. The clean-off step is unglamorous and not optional.
Multi-colour same-material prints are fine. If you ran a colour-changing PLA print, the greens, blues, and whites blend together when shredded and moulded into a single coloured part. It might not be the exact colour you would have picked, but the polymer is the same and the part is sound. The same applies to half-used spools of mismatched colours, mix them freely as long as the material type matches.
Multi-material prints are the problem. PLA printed with PVA water-soluble supports, PETG with HIPS breakaway supports, dual-extruder builds with two different polymers. The materials are physically bonded and separating them by hand is rarely worth the time. These parts are generally not recyclable through either route. If you print a lot of multi-material work, the honest answer is to design for single-material where you can, or accept that the cross-material prints are end-of-life. The same logic applies to the purge band when you switch materials mid-print, the transitional plastic is a mix of two polymers and should go in the bin.
You don't need to recycle every failed print. You need to recycle the ones worth the time. Tiny single-piece failures, prints contaminated with adhesive, multi-material composites, mystery filament with no label, all of those can go in the bin without guilt.
Filament types, by recyclability
Most people see 3D printing material as a different category of plastic from the stuff lying around the house. It isn't. ABS is the plastic in Lego bricks, keyboards, and car dashboards. PLA is the same material used in biodegradable food containers and disposable cups. TPU is what phone cases and shoe soles are made from. PETG is an improved version of PET, the polymer in nearly every drinks bottle. Commercial injection moulders work with all of these every day at industrial scale. Your desktop setup can work with them too, with the right preparation.
| Filament | Common use cases | Shred behaviour | Moisture | Injects? | Best moulded products |
|---|---|---|---|---|---|
| PLA | Models, prototypes, biodegradable goods | Easy, low temperature, room-temperature shredding fine | Picks up moisture, dry before melt | Yes, easy at ~200°C | Rulers, keyrings, beads, small accessories |
| PETG | Functional parts, drinks-contact items | Standard | High, dry thoroughly before melt | Yes, very well at ~240°C | Containers, clear or tinted parts, mid-strength products |
| ABS | Lego, helmets, automotive interiors, structural prints | Standard | Moderate | Yes at ~230°C, needs ventilation | Buttons, fittings, technical parts |
| TPU | Phone cases, shoe soles, flexible parts | Soft, binds most shredders, designed-for shredder helps | High | Yes at ~180°C with care | Gaskets, grips, soft-touch products |
Temperatures shown are the optimum melt temperatures from our Material database, tested on the Injection Mini V2.
PLA
PLA melts at a low enough temperature that desktop kit handles it cleanly, which is why it is the easiest filament to recycle at home. It is bio-derived from corn starch or sugarcane, and theoretically compostable, but only at industrial composting facilities running above 60°C. Home composting does not break PLA down meaningfully. In the UK, industrial composting routes for PLA are rare and most council waste streams do not accept it.
For most makers that leaves two practical routes, and PLA is the one filament where both are realistic on desktop kit. The Injection Mini V2 handles shredded PLA flake well at around 200°C, and PLA is the material to start on if you are new to injection moulding from recycled feedstock. The temperatures are forgiving and clean prints behave predictably. PLA is also the friendliest filament for the back-to-filament route, the Extruder Mini V2 can produce usable filament from shredded PLA, with the tolerance caveats covered in the back-to-filament section below.
Two quirks worth knowing. PLA solidifies at a lower temperature than the other common filaments, so the mould often needs cooling (a few seconds in a bucket of water is usually enough) before the part will release cleanly. You rarely need to do this with HDPE or PP, but PLA expects it. The other quirk is brittleness. Injection moulded PLA is more brittle than PP or HDPE, which is fine for a ruler or a keyring but worth knowing if you are making something that takes load. You will not notice the brittleness much when 3D printing, the layered structure hides it. When the same plastic is moulded into a solid part, it shows.
PETG
PETG is a glycol-modified version of PET, the same polymer family as drinks bottles, and is increasingly popular for functional prints. It is tougher than PLA, more heat-resistant, and food-safe in many formulations. Recycled PETG injects well, holds detail, and produces durable parts. One feature worth flagging: if your PETG waste stream is transparent, it stays transparent after injection. That opens up products that benefit from a glass-like finish, lenses, containers, decorative pieces. Moisture is the catch. PETG is hygroscopic and absorbs water aggressively, so dry it thoroughly before melt or you get bubbles, foaming, and weak parts.
ABS
ABS is the plastic that built the consumer electronics era. It is in Lego, keyboards, helmets, and most car interiors, all manufactured by injection moulding from the same polymer your failed prints are made of. Recycled ABS moulds into tough, durable parts. Ventilation is the constraint. ABS produces a strong odour when molten and benefits from a fume extractor. A Fume Extractor V2 is recommended if you work with ABS indoors.
TPU
TPU is the filament we get most excited about on the injection side. It lets you make soft-touch products nothing else in the filament range can produce: grips, gaskets, sealing rings, flexible enclosures, watch straps. Shredding it is the awkward part. TPU is soft enough to flex around most cutters instead of being chipped cleanly, which can bind a shredder. The Desktop Shredder V2 is built with this in mind, the cutter geometry and motor torque are tuned for flexible polymers, so it handles TPU where most desktop shredders stall. Worth running if you have a TPU-heavy waste stream and want to widen the range of products you can make.
A note on the rest
3D printers handle more than the four filaments above. HIPS is widely used as a breakaway support for ABS prints. Nylon (PA) turns up in functional builds, often as a glass-fibre-reinforced grade like PA6-GF15. PBAT is appearing in compostable filament ranges. TPE and TPR show up as alternatives to TPU for flexible parts. All five are in our Material database with melt temperatures and observation notes from real tests.
Higher-temperature filaments like PC (polycarbonate) and PEEK exist, but they typically want melt temperatures above where the Injection Mini V2 and Arbour Injection Machine V2 operate. If you have PC or PEEK waste, the desktop injection route is not the right tool. Industrial reprocessors are.
The moisture problem
PLA, PETG, ABS, and TPU all absorb moisture from the air. PETG, TPU, and Nylon are the most aggressive at it, but PLA picks up enough moisture from a humid week to cause problems too. Drying before melt is the rule, whichever filament you are working with. Wet plastic melts badly. You get bubbles, foaming, weak parts, and inconsistent flow.
The fix is a 4 to 6 hour bake at the filament manufacturer's recommended temperature (typically 60 to 80°C) in a kitchen oven, food dehydrator, or dedicated filament dryer. The bake removes most of the absorbed water and works on shredded flake the same way it works on whole filament. Dry just before you melt, not days in advance, and store in a sealed box with silica gel if you must store between sessions.
Injection moulding is more forgiving of moisture than 3D printing is. A 3D print fails visibly when the filament is wet (popping noises, stringing, weak bonds between layers). An injection mold absorbs the same moisture more gracefully. The part comes out, it just might not be as strong as it could be. Worth drying anyway, but the failure mode is less dramatic.
Why back-to-filament is harder than it looks
The popular advice for failed 3D prints is to shred them and re-extrude them into new filament. This route gets a lot of YouTube views. It also gets attempted, fails, and is abandoned at high rates. The reasons are technical, not motivational.
Standard FDM 3D printers expect filament at 1.75mm diameter, with a ±0.05mm tolerance. That is a window of one tenth of a millimetre. Miss the diameter by even half that and your printer under-extrudes or jams mid-print. Recycled material has variable melt flow, even when it is sorted, clean, and dry, because viscosity drifts after a heat cycle. Variable melt flow means variable extrusion rate, which means variable diameter.
Holding diameter requires the extruder, the cooling fan, and the pull mechanism to hold their setpoints in unison. Commercial filament factories use industrial line control to do this. DIY filament makers approximate it, with mixed results.
Material degrades on each re-melt cycle. PLA's polymer chains break down a little every time it is melted (chain scission). After two or three cycles the material is brittle and printable only at higher temperatures with reduced part strength. ABS is more tolerant, PETG sits in between, TPU degrades fastest of the four.
One contaminant or one air bubble breaks the line. A speck of dirt or dust larger than your printer's nozzle diameter (typically 0.4mm) is enough to jam the hotend on the first failure. An air bubble from undried moisture creates a void in the strand that snaps when it feeds into the printer. You may produce filament that looks fine on the spool, only for the first defect to stop the print mid-run. Recycled material introduces both of those failure modes far more often than virgin filament does.
Most DIY filament rigs struggle to hit print-grade tolerance. The Filabots, Felfils, and 3devos of the world cost thousands of pounds and still require expert operation to produce print-grade filament. A homebuilt rig will produce filament, but the output is rarely as good as new, and printers are unforgiving of inconsistent stock.
Making 3D printer filament from recycled stock is precision manufacturing, not a maker hobby. It is possible. It is just much harder, more expensive, and less reliable than the YouTube videos suggest. If filament-making is the goal, expect to invest the same way you would in any precision rig.
If you do want to make filament
There is one back-to-filament route we actively recommend, and it is not the failed-print one. The Filament Maker converts clean, prepared PET drink bottles into 3D printer filament by cutting the bottle into a continuous strip and pulling it through a heated die. The PET in a drink bottle is still virgin material, it has not been through an injection or extrusion heat cycle, so the diameter tolerance, melt flow, and consistency are workable in a way that re-extruded printer waste rarely is. You also start with a flat, dry, contaminant-free input, which sidesteps most of the failure modes above.
It is not the answer for your stash of failed PLA prints, those still want the injection route. But if making 3D printer filament from recycled material is the project, PET bottles are the realistic starting point. The PET bottle preparation and best 3D printer settings for rPET guides walk the full process.
Why injection moulding is the easier path
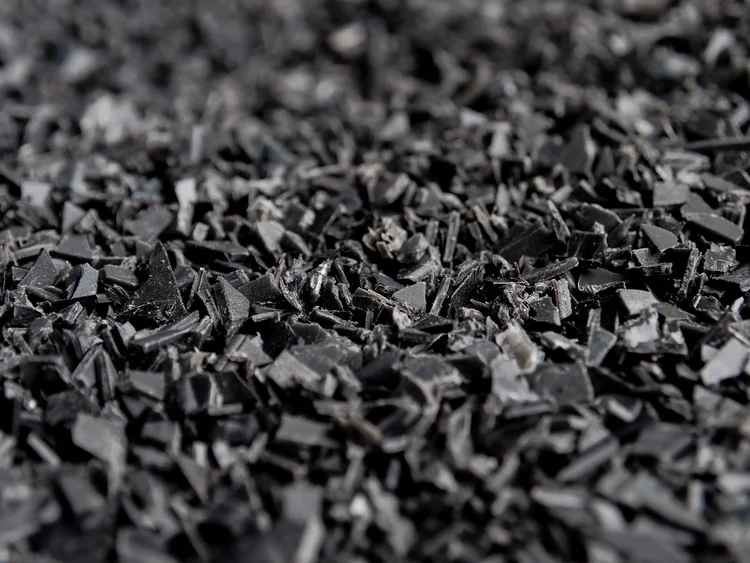
Injection moulding accepts almost everything the filament route rejects. A shredder produces irregular flake, big chunks, dust, a mix of sizes, and the mould melts it all together. There is no "wrong size" of input within reason. A slightly different viscosity between batches changes the mold fill time by a couple of seconds, not the success of the run. The part comes out the same.
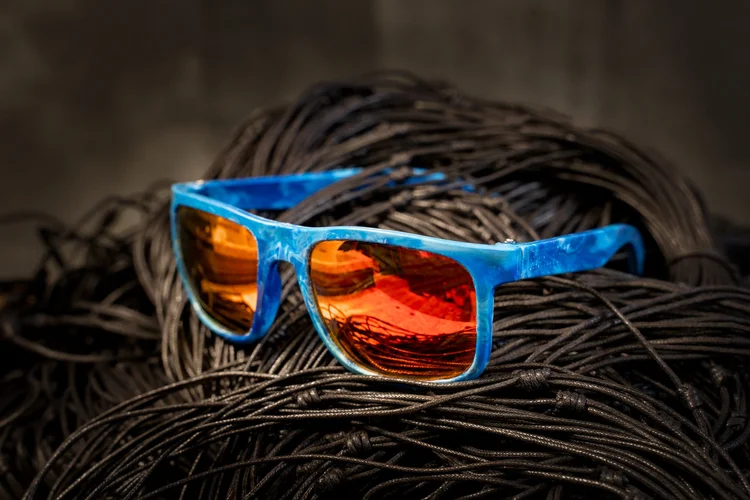
The output is a finished product. Filament is a feedstock for a second machine and a second tolerance window. A moulded ruler, keyring, comb, sunglasses frame, or phone holder is something you can hand to a customer, sell at a market, or take home. The part is done when it leaves the mould.
The polymers your failed prints are made of are the same polymers that manufacture phone cases, helmets, Lego, and car parts every day at industrial scale. Those products are made by injection moulding, not 3D printing. Your desktop injection setup is the small-scale version of the same workflow, applied to your own waste stream.
Most desktop injection machines need pre-made pellets to feed the hopper, which means you either buy pellets or run a full pelletising line before you can mould anything. The Injection Mini V2 and Arbour Injection Machine V2 have wider feed openings designed to accept shredded flake directly from the Shredder Mini V2 or Desktop Shredder V2. One step from waste to product.
For a worked example, the How to make V1 sunglasses guide walks the full build: sunglasses from 25g of recycled PP. The same workflow applies to PLA, PETG, ABS, or TPU with temperature adjustments. The How to make money recycling plastic guide covers the per-kg economics of finishing the cycle this way rather than stopping at flake or pellets.
Where to start
Five audience scenarios for reusing 3D printer waste, with the kit and setup we recommend for each.
A hobbyist with occasional failed prints should save up and batch-process. Even a kilo a year, collected over time and sorted by polymer, becomes enough to make a useful batch of products. A small bin of clean PLA moulds into a dozen rulers or a set of keyrings, well worth the wait.
A maker with regular waste can start with a Shredder Mini V2 plus an Injection Mini V2. The Budget Injection Setup in Workshop setup examples and budgets lays out what it costs.
A school with multiple printers benefits from a shared shredder and one injection moulder, used in lessons to turn class waste into rulers and keyrings. It is also a closed loop on the school's plastic spend, last term's failed prints become next term's teaching products. The Educational Setup on the same page is sized for this.
A 3D print farm running multiple machines is the largest opportunity on this list, and it is a commercial one. Print farms generate tonnes of waste across a broad material range, which is exactly the input variety an injection moulded product line wants. Adding moulded products to the print farm catalogue turns a waste stream into a second revenue line, and print farms are already equipped to make their own moulds, either in-house using their printers (see our 3D printed moulds service for the Sustainable Design Studio version) or by commissioning premium tooling.
A studio scaling up should look at the Small Business Setup on the same page, plus the How to make money recycling plastic page for the economics ladder.
Related resources
Three picks from the Sustainable Design Studio resources library that pair directly with reusing 3D printer waste.
 Guide
Guide
How to make money recycling plastic
The four-stage value ladder that puts this guide in context. Where the kilos of failed prints sit on the economic ladder.
 Reference
Material database
Real test data for every plastic we have run through the Injection Mini V2. Melt temperatures, MFI, shrinkage, observations.
 Guide
Guide
How to make V1 sunglasses
A full worked example of injection moulding from recycled feedstock. The same workflow applies to PLA, PETG, ABS, and TPU.
Got 3D printer waste piling up?
Talk to us. We have helped makers all over the world set up small injection workshops, often built around exactly this problem.